Pages

10 July 2013

Chocolate Mousse...with a twist


I know, another blackcurrant recipe. But bare with me, this one's a cracker. 


As I said in my last post, our blackcurrant bush is really going to town this year so we're making the most of it. Given I wear the baking crown in this house and we were all out of sweet treats, the kitchen called. Problem was, I really didn't want to turn on the oven. This heat (which I'm loving, by the way) really is not oven-friendly. I was, however, in the mood for chocolate. Inspiration struck - chocolate mousse was the answer. A beautifully light, chilled dessert that really hits the spot.


I could have folded through the blackcurrants to have a tart contrast to the sweet chocolate but didn't want to just stop there. Instead, I cooked the blackcurrants until they were bursting juicily then folded in a little cream and white chocolate to make a beautiful blackcurrant-white chocolate truffle mix. Dang, it was good! 

Finally, because I don't like to make life easy for myself, I made edible containers for my mousses. I painted silicone cupcake liners with white chocolate then unmolded them to have white chocolate pots. Whilst this isn't technically all that challenging, doing it in 25+ degree heat may not be the best idea. 


I don't like to toot my own horn but you really need to try these. They are so good. My oldest brother even told me "these are one of the best things you've ever made...and that's saying something" before going back for seconds. 

Mousse ingredients:
85g dark chocolate
1/2 tsp coffee granules
1 tbsp cocoa powder
2 tbsp boiling water
50g greek yogurt
2 egg whites
1 tbsp caster sugar

Method:
Start by melting the dark chocolate either in a bain marie or in the microwave. In a small bowl combine the coffee, cocoa powder and boiling water to a smooth paste. Add this to the melted chocolate and mix until blended. 
Add the greek yogurt and mix again to fully combine. (Side note - at this point you have a really delicious and light truffle mixture)
In a clean bowl whisk the egg whites to soft peaks. Slowly add the sugar and continue whisking until thick and glossy.
Fold one third of the egg whites into the chocolate mixture to loosen then add this mixture back into the remaining egg whites. Fold until fully mixed and no white bits remain.
Chill this in the fridge for at least an hour.

Blackcurrant sauce ingredients:
100g blackcurrants
1 tbsp caster sugar
2tbsp boiling water
1 tbsp double cream
25g white chocolate, melted

Method:
In a saucepan heat the blackcurrants, sugar and water until the blackcurrants are softened and about to burst.
Transfer the berries to a bowl and add the cream and white chocolate. Mix until fully combined. Taste and add more white chocolate if you would like the sauce a little sweeter. Don't be afraid to crush some of the blackcurrants whilst mixing, it only adds to the flavour and beautiful purple colour.

White chocolate cups:
Melt 150g white chocolate. Paint a thin layer over 6 silicone cupcake liners. Place them in the freezer for 5 minutes until the chocolate is set. Paint another layer. You have to do this quite quickly because the melted chocolate sets almost as soon as it comes into contact with the frozen chocolate. Once a second layer has been spread return to the freezer for 20 minutes.
Take the molds out of the freezer and check that there are no patches where the chocolate is a bit thin - you don't want these cracking. 


To construct, a spooned a little of the blackcurrant sauce into the bottom of each white chocolate cup. I then filled the cup to the top with a big spoonful of chocolate mousse. For a final flourish I added a little more blackcurrant sauce to the top.


My cups were certainly not the neatest thing I've seen in a long time. But they're going to be filled with beautiful chocolatey goodness and tart blackcurrant sauce so who cares, right?

(Keep these in the fridge until ready to serve)


3 July 2013

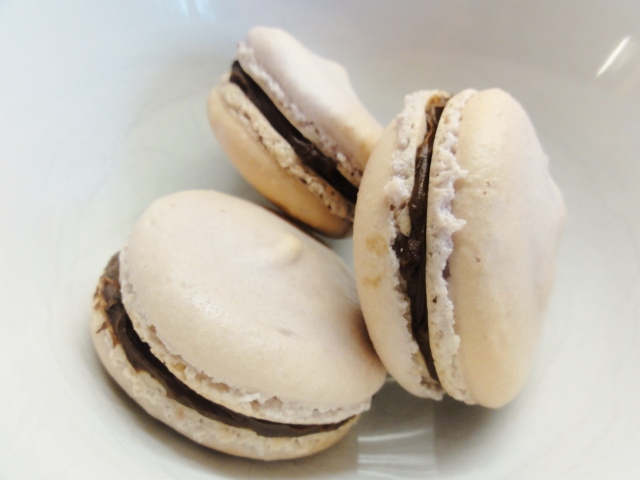
Dark Chocolate and Blackcurrant Macarons


For some reason macarons have a notorious nature of being really difficult to make. I really don't understand where this comes from. There's this big rumor around the baking world that they're super temperamental and a massive challenge to take on. I'm going to try to set things straight - they're not. In fact, they're seriously easy. All you have to do is a little bit a whizzing with the food processor (and let's be honest, the machine does all the hard work), then a little bit of egg-white-whisking (and you can get an electric whisk to do that too), followed by a spot of folding together, and ta-dah. Macarons.  


At home we've had a blackcurrant bush for years now and every summer nothing grows. Not a one. But this year, it is flourishing. So I thought I'd get a little bit inventive with flavours and make a blacurrant and dark chocolate ganache to go in the middle of these bad buys. It might just be, but the combination of cream and chocolate makes me intensely happy. Pity, it will make me intensely fat if I eat it every day (and I so would). 


Anyway, macarons first.

Macaron ingredients:
110g icing sugar
60g ground almonds
2 egg whites
40g caster sugar

food colouring - optional

Method:
Start of by whizzing the icing sugar and ground almonds in a food processor. Now the first time I ever made macarons, I thought to myslef "no way am I washing up that big ol' machine. Icing sugar's crazy fine as it is so I'll just skip that step". Mistake. Do this step! 
Next, whip the egg whites to a stiff peak. If you're feeling lazy, or a little short of time, you are more than welcome to use an electric whisk. Or you could make like me and give your arms a little bit of a workout by doing this by hand

Once you have stiff peaks start to add the caster sugar. Do this a little at a time and make sure you whisk really thoroughly after each addition so that the sugar gets fully incorporated and the mix isn't grainy

Once all the sugar is added this is where you add food colour if you're using it. It's not necessary but I think it adds a little something. I was going for a pretty purple to match the blackcurrant flavour. It didn't really work too well; ended up being more of a pale pinky-grey. But ho hum. 
Finally, fold in the icing sugar and almond mixture. Do this carefully so that you don't knock all the air out of the egg whites.

Spoon the mixture into a piping bag and pipe small rounds of mixture onto lined baking trays. Once you're done piping bang the trays against the work surface a couple of times to get rid of any larger air bubbles. Then leave them for at least half an hour. This stage is crucial in achieving the final result. This time lets the hard shell and the 'foot' develop. The longer you can leave them, the better.
After they've sat, pop them in an oven set to fan 160 and bake for 10 minutes. You know they're done when they come away easily from the baking paper. If they're still sticking put them back in for a minute or two. Let the cool completely on the tray. 

Dark chocolate and blackcurrant ganache:
50g dark chocolate
50ml double cream
50g blackcurrants
1tsp caster sugar
1tbsp creme de casis

Start off by cooking the blackcurrants over a low heat with the caster sugar and a teaspoon of water. Cook them for about 5 minutes until they're soften and starting to burst. 

Push them through a sieve to get rid of the seeds then mix in the casis. 

Heat the cream until it just starts to boil then pour over the chocolate. Stir until completely blended then add the blackcurrant mix. 
Set aside until cool then sandwich between two macaron shells. 


1 July 2013

Rhubarb Crumble Cake


My mum has a thing about rhubarb. Every time she sees it in a shop she buys it. No matter if we already have an excess of fruit in the fridge (ahem, 3 boxes of strawberries, a box of rasperries, 8 peaches, 1 punnet of nectarines, 2 bags of grapes, a pineapple and a mango), or if she already knows I sometimes struggle with rhubarby ideas. I can guarantee that 99% of you, myself included, immediately think of crumble when you hear the word 'rhubarb'. But when the sun comes out, crumble is the last thing I want. This weekend the sun came out in full force...I have the sunburn to prove it. I'm by no means complaining though; being the absolute sun-lover I am, I'll take a little bit of sunburn any day over chilly winds and rain. So I had to come up with something that used up our rhubarb but wasn't as dense or as wintery-comforting as crumble. After a little bit of searching I found quite a few recipes for rhubarb cakes and rhubarb crumble tarts. I did a bit of a hybrid of both and made a rhubarb crumble cake. 


It's a pretty simple cake mixture, topped off with some rhubarb chunks and the sprinkled with crumble topping.

So, recipe time:

Crumble ingredients:
50g butter, melted
25g light brown sugar
40g caster sugar
100g plain flour

Method:
Melt the butter in a pan over a low heat. Add the two sugars and stir quite vigorously until they're fully incorporated and it looks a little a toffee sauce. Beat in the flour and set aside to cool whilst you cut the rhubarb and make the cake batter.

Rhubarb ingredients:
300g rhubarb
50g caster sugar
2tbsp lemon juice

Method:
Cut the rhubarb into inch-long chunks and place in a large bowl. Add the sugar and lemon juice and toss a few times before setting aside.


Cake ingredients:
100g plain flour
100g caster sugar
1/2tsp bicarbonate of soda
1/2tsp baking powder
75g butter
50g ground almonds
6tbsp natural yogurt
1 egg
1 egg yolk
1tsp vanilla extract

Cake method:
Preheat the oven to fan 160. Grease and line an 8-inch square tin.
Place the flour, sugar, bicarb, baking powder, butter and ground almonds in a mixing bowl. With your hands (clean preferably) rub the butter into the other ingredients until it looks like breadcrumbs. 
In a mixing jug, or smaller bowl, mix the egg, yolk, yogurt and vanilla. Add this to the other bowl and mix, this time with a spoon, until fully combined.
Spoon the cake batter into the tin. Top with the rhubarb then sprinkle over the crumble bits.
Bake for 40 minutes and leave to cool completely in the tin. 


24 June 2013

Bake Sale


This weekend I spent a serious amount of time in the kitchen. For the first time ever I was baking to sell my stuff which also meant for the first time ever I was baking for people other than family and friends. I was exposing myself to comments and feedback from people who aren't bound by the rules of friendship to say only nice things. 

I sold my goods at a school event. It was an outdoor summer party, but the weather was so horrendous that it definitely did not feel like summer. When I first volunteered for this, it was expected that 800 people would turn up but the awful weather meant that only around 300-400 came.

I made my best ever chewy cookies, white and dark chocolate chunk brownies, dark chocolate and strawberry blondies and vanilla, lemon and chocolate cupcakes. 

Unfortunately I don't have a huge number of photos because I was literally baking non-stop and didn't have time to many snaps. However, I shall attempt to paint a beautiful foody picture using my descriptive talents...let's see how that goes.

So I started off with the brownies. I followed Nigella's Everyday Brownie recipe from her 'Kitchen' book. I've been using this recipe for years and seriously do not think another recipe lives up to it. Every single time I've baked them they have turned out gorgeous. They are divinely gooey in the middle with a slight hint of chewy crust around the outside. Me and my brothers love our brownies seriously soft, to the point of being almost raw in the middle. 


For this event I baked them about 10 minutes longer which meant they still had the delicious soft chew factor without being so soft that you can't even pick them up let alone eat them from a napkin whilst holding on to any form of social dignity. I made four batches of these but here's the recipe for one batch of 12 really big or 16 more delicate sized brownies:

Ingredients:
150g butter
300g light brown sugar
75g cocoa powder
150g plain flour
1tsp bicarbonate of soda
4 eggs
150g chocolate chunks

Method:
Preheat the oven to fan 170. Grease and line an 8 or 9 inch square pan.
Start off by melting the butter in a medium sized pan. Once it's all melted add the sugar, still on the heat, and beat quite vigorously until fully incorporated.
Sift in the cocoa powder, flour and bicarb and fold that in. The mixture will look really dry but don't panic. Remove the pan from the heat.
Add the eggs, one at a time, and beat in rapidly to avoid scrambling (no one wants eggy brownies).
Add the chocolate chunks and mix briefly to avoid melting. Pour the batter into the pan and bake for anywhere between 20 and 35 minutes, depending on how you like you brownies. Leave them in the tray to cool completely.


Next I baked the cookies. Follow the link above for the recipe. For the bake sale I did three times the amount in that post and ended up with 52 cookies. I should have made more because the kids really went for these and they sold out well before the evening was over.

After cookies I made cupcakes. I started with good old vanilla, then used the same recipe to make lemon, this time adding lemon juice, and then made chocolate but this time adding melted dark chocolate. Here is the recipe for 18 big cupcakes.

Ingredients:
230g butter
230g caster sugar
4 eggs
280g self raising flour
2tsps baking powder

For vanilla - 2tsps vanilla extract
For lemon - 4tbsp lemon juice
For chocolate - 75g melted dark chocolate

Method:
Preheat oven to fan 160. Line 18 holes in cupcake pans with cupcake cases.
Beat together the butter and sugar until light and fluffy.
Add the eggs, one at a time. If the mixture starts to look a little curdled add a tbsp of the flour.
Fold in the flour and baking powder, followed by the additional flavourings.
Bake for 20 minutes until well risen and spring back when touched lightly. 
Leave them in the tins for 5 minutes before transferring to a wire rack to cool completely. 

I iced both the chocolate and vanilla with a white chocolate buttercream and iced the lemon cupcakes with a lemon buttercream. I also sprinkled some blue and yellow sanding sugar on the vanilla and lemon cupcakes and shaved a little dark chocolate onto the chocolate cupcakes. 


Last but not least, I made blondies. I roughly followed the Hummingbird Bakery recipe but instead of adding nuts, I threw in a whole load of dark chocolate chunks and dried strawberries, and I added half the caster sugar and replaced the other half with light brown sugar. The dark chocolate added a little hint of bitterness to cut throught the white chocolate sweetness, and the brown sugar adds a hint of toffee-ish depth, making them, in my opinion, crazy tasty. Here's the recipe:

Ingredients:
150g white chocolate
125g butter
75g caster sugar
75g light brown sugar
2 eggs
200g plain flour
125g additional chunky goodness (whatever your heart desires)

Method:
Preheat the oven to fan 150 and grease and line an 8 inch square tin.
Melt together the white chocolate and butter in a medium saucepan, or in a bain-marie. If you choose to do it in a saucepan, make sure you pay careful attention to not burn the chocolate as white chocolate is really sensitive to heat.
Once it's all melted add it to the sugar in a large mixing bowl and beat well to combine.
Add the eggs and mix again then fold in the flour. Just before the flour is fully incorporated add the chunks and fold a few more times to evenly distribute them. 
Pour the batter into the tin and bake for 30-35 minutes so that they are slightly golden but the centre is still soft.